Blurry and grainy photos can be caused by a variety of reasons, even with high resolution photos. And though there are solutions to some of the problems, many cannot be corrected.
It is always our goal to print your order exactly as it appears on the review page. But in some situations, prints or photos in your projects may appear blurry or grainy when they arrive. Reordering or asking us to resubmit the same project will not correct the problem, so for all the causes listed below, we recommend substituting any blurry or grainy photos with clearer versions.
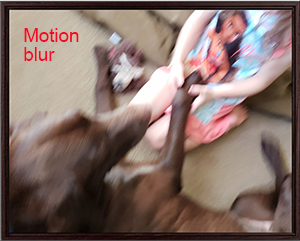 The most common cause of blurry high resolution photos is motion blur, but camera settings and shooting environment/conditions can cause them as well. In addition, some causes are specific to printing on products and details on those follow. Below that section are recommendations for avoiding blurry and grainy photos when taking the photos.
Printing on products
Note: Using low resolution photos is the most common cause of blurry, grainy and pixelated product photos, but we warn you when that occurs. However, if your photo is high resolution, please be aware of these problems.
- Large photos with a very high resolution will become compressed when printed, causing some blurriness because printing resolution is much more limited than camera resolution. This is generally only a problem when printing on a small sized print or product but is not a problem for large products. The problem can sometimes be corrected by downsizing the photo with editing software.
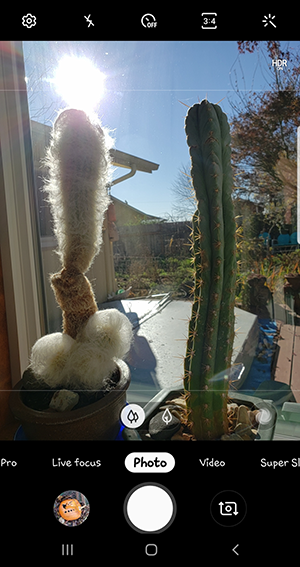
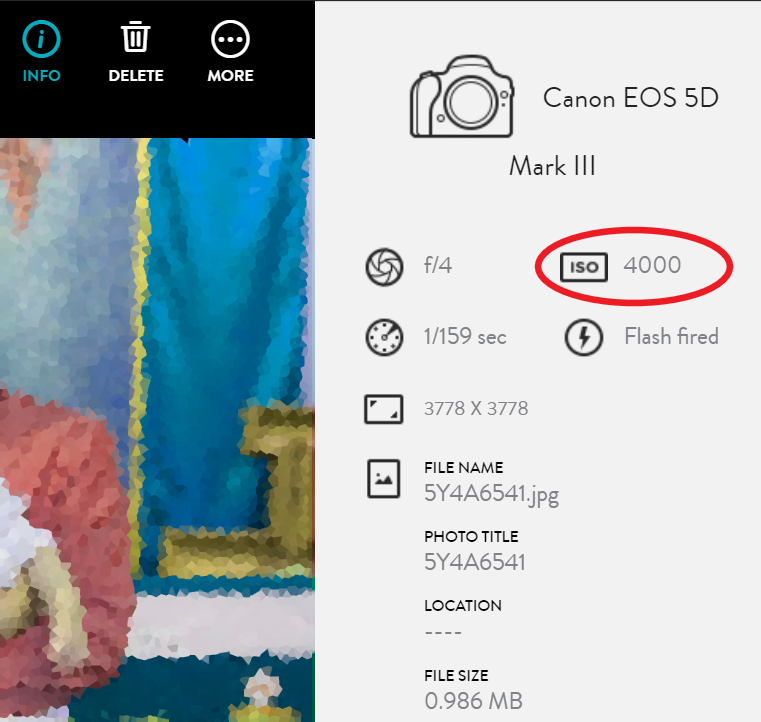 Photos taken with high ISO camera settings will appear grainy when printed. This may not be evident on your computer or phone, because the display is often smoothed by algorithms in the device. Generally, ISO settings over 400 will show some graininess, and the higher the ISO setting, the grainier they will appear on your prints or products. You can usually see this graininess when viewing the photo details page (see right) where you can also view the ISO setting (depending on the camera or photo source). The problem can sometimes be corrected by smoothing the photo with editing software.
- If your photo’s resolution is high, but the file size is small, it is an indication that the file is
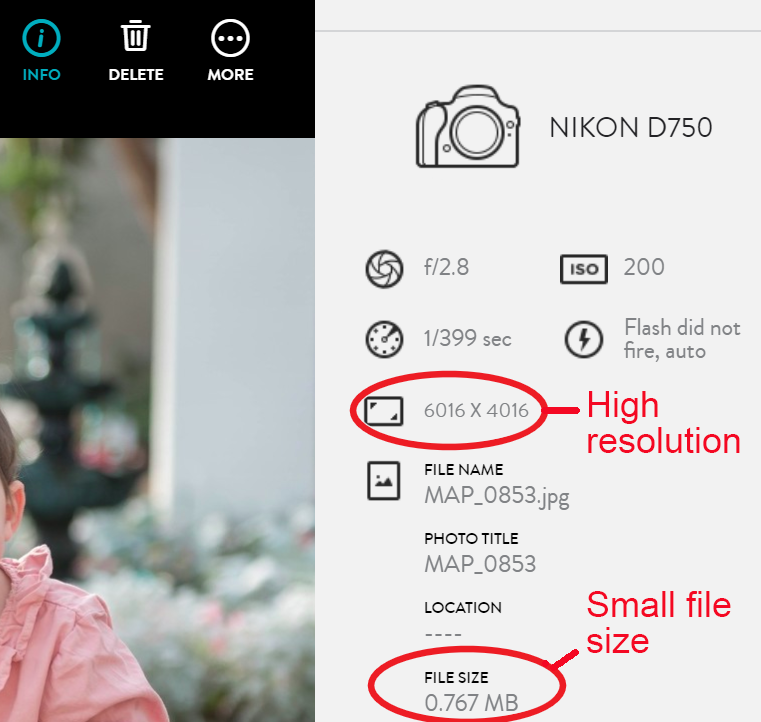 compressed, and any prints or products created with it will appear blurry. This is frequently a problem with photos obtained from professional photographers, and the best solution is to request uncompressed versions of the photos.
 - Bright photos with subjects in front of bright light sources, can result in a loss of clarity, darkening of the subject and washing out of details. This includes photos with indoor lights, sunsets, windows, snow fields, etc. in the background. Adjustment of contrast and other corrections can sometimes improve the clarity of bright photos.
- The dominant color in an image can affect the printing of other colors, leading to a loss of clarity in the image when ordering small products.
Recommendations for motion blur
 Use a tripod to keep your camera steady when taking photos. If unavailable, keep yourself and your camera steady by leaning against a wall, column, or other stable structure.
- Use a self-timer or shutter release cable, even when using a tripod to avoid the camera shaking when you press the shutter release button. If unavailable, press the shutter release button very gently.
- If possible, try putting the camera in anti-shake mode when trying to take pictures from a moving vehicle.
Recommendations for camera settings
 Choose a higher shutter speed especially when zooming in on distant objects or are trying to capture movement.
- High ISO settings will increase brightness but can cause grainy photos and loss of detail. Generally, you should not increase the ISO on your camera unless you are shooting in low light environments and cannot use a flash, or if you are capturing movement. If you have increased the ISO setting and your photos are grainy, reduce the ISO setting.
- Use continuous burst mode if available on your camera to take multiple shots while pressing the shutter release button. The motion of pressing and releasing the button will both move the camera slightly, so if you take 3 (or more) shots, the second one will be sharper than the first or the last.
 Use a flash, especially in low light situations when you would need a slow shutter speed to get a correct exposure.
- Try switching between camera modes if your camera is not focusing properly. Go into the camera app, click mode (if needed), select any of the modes offered and then go back into mode and hit “Auto” or whatever mode you started with.
- Try pointing the camera elsewhere to focus and then bring it back to what your subject and refocus.
Recommendations for environment/conditions
 Avoid overexposure and shooting subjects against bright light sources, which can result in a loss of clarity, darkening of the subject and washing out of details a mentioned above. Using a flash along with a faster shutter speed to underexpose the background will help overcome these problems.
- Hold your breath while pressing the shutter button in low light if you are using a very slow shutter speed and don’t have a tripod or shutter-release. This will help reduce blurring especially when taking close-up pictures or zooming in.
- Clean your camera lens before taking photos because mist, dirt, smears, and smudges on your lens result in blurry images. Note: The camera lens may fog up frequently in high humidity areas or it’s raining heavily, so use a soft cleaning cloth and wipe the camera lens before you take each picture.
- For smart phone cameras, sometimes the phone case can be too close to the camera lens, so try removing the case and taking some test shots. If you find the
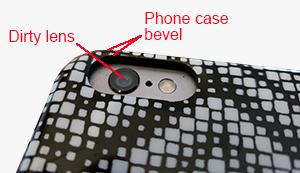 phone case was causing your issue, buy a different case with a wider opening or no bevel that can interfere with the lens.
 - Update your camera app to the latest version if you notice consistent blurry photos, as a dated app can sometimes be the cause.